| Before using Texplorer for the first time, you must complete the ME3Explorer Setup Guide. |
| Want to install TPFs? All users who wish to install TPFs with TPF Tools, must use Texplorer for some initial setup. Pay close attention to the Background and Usage sections below to help you do this properly. |
| Kfreon is the lead developer for ME3Explorer's Texplorer, originally created by Saltisgood. |
| This article has been updated for ME3Explorer v3.0. |

Texplorer is ME3Explorer's main and most advanced tool for modding textures (armor, weapons, clothing, etc). With it, every texture in the Mass Effect trilogy can be viewed, extracted, and replaced.
Texplorer is for textures only. It does not allow for the browsing or editing of meshes. Texplorer is also not a texture/photo editor. Editing extracted textures requires a program such as PhotoShop, GIMP, or Paint.NET.
Background[]
Before using Texplorer, it's extremely important to understand certain key details about how textures are handled in Mass Effect. Doing so now will minimize confusion and time spent troubleshooting later. Before continuing with this article, ALL users should read An Intro to Mass Effect Mods and Textures in Mass Effect. The latter, especially, is imperative to obtain a basic understanding of how texture replacement in the trilogy works.
As discussed in Textures in Mass Effect, the three games vary in exactly how textures are stored. For ease of discussion, this article will use the terms "PCC" and "TFC", when needed.
Treebuilding + Hashes
Before Texplorer can be used, it must develop an inventory of what's present before the textures can be viewed and edited. We refer to this as "Texplorer scanning" or "treebuilding" because the inventory is stored in a file called me#tree.bin, and the results displayed in a tree-like structure. Each game is treated separately and has its own "tree".
The tool builds its inventory by looking through the files and gathering information about all textures encountered. Data such as where each texture is stored, which files reference it, the size, compression algorithm, appearance, and more are collected.
Most importantly, as each texture is inventoried it's assigned alpha-numeric code called a "hash" (e.g., 0x42EE7CBF). This hash is used to locate the texture's "address" in the future, and is the same hash used by Texmod Package Files (TPFs) when modifying textures.
Preparation[]
| DO NOT scan on texture-modded files! If you've already applied TPFs, you MUST vanilla the game prior to scanning. |
Like ModMaker, Texplorer is a cross-platform tool that mods all three games in the trilogy. Its initial setup is a resource-intensive process, therefore running other CPU-intensive programs simultaneously (games, video-editing, etc) can result in crashes and should be avoided. Launching the tool opens a corresponding Debug Window, which should be left open when possible. It will convey important details about tool operations as they pertain to the game files.
Before Scanning
The condition of your game files prior to scanning is the most critical part of the texture process. Toolset veterans know this used to be summed up with the mantra of "Never scan on modded files!".
However, with the advent of DLC mods and the ability to add brand new textures to the game, this is no longer the case. The situation is now much murkier. Mod creators need to get in the habit of communicating how textures are handled in their mods. Conversely, mod users need to follow a few general rules and have a slightly more sophisticated understanding of the texture replacement process (as found in this article).
Here are the general rules every user should understand. Don't use the tool until you understand them.
- Scanning a modded texture creates a different hash than the vanilla texture.
- TPF files use vanilla hashes to match their textures to the game's.
- The base game and all BioWare DLC should always be clean of modded textures prior to a scan.
- Content mods may be installed into the base game/BW DLC, but these files cannot have texture modifications.
- To apply new textures to content mods (MEHEM, ThaneMOD), you *must* install the content mod PRIOR to scanning.
- DLC mods may add/change textures via new TFCs & PCCs. Scanning on these mods is okay.
- To ensure Texplorer handles scanning DLC mods properly, only use stable releases 110+ and beta revisions 707+. For best performance, use the v2.0 Stable and above.
DLC don't have to be included in the treebuilding process; it's up to the player. To view or replace these textures, however, they must be inventoried, and to be inventoried, DLC must be extracted. We encourage all Texplorer users to upgrade to v2.0 and above, so the extraction process can be handled upon toolset opening. See ME3Explorer Setup Guide for details.
Opening the Tool
As explained above, the process of treebuilding dictates which textures you are allowed to view and modify with Texplorer. Scanning all 3 games will take around an hour and will begin immediately upon opening the tool for the first time.
When ready to scan, go to User Tools > Textures > Texplorer:
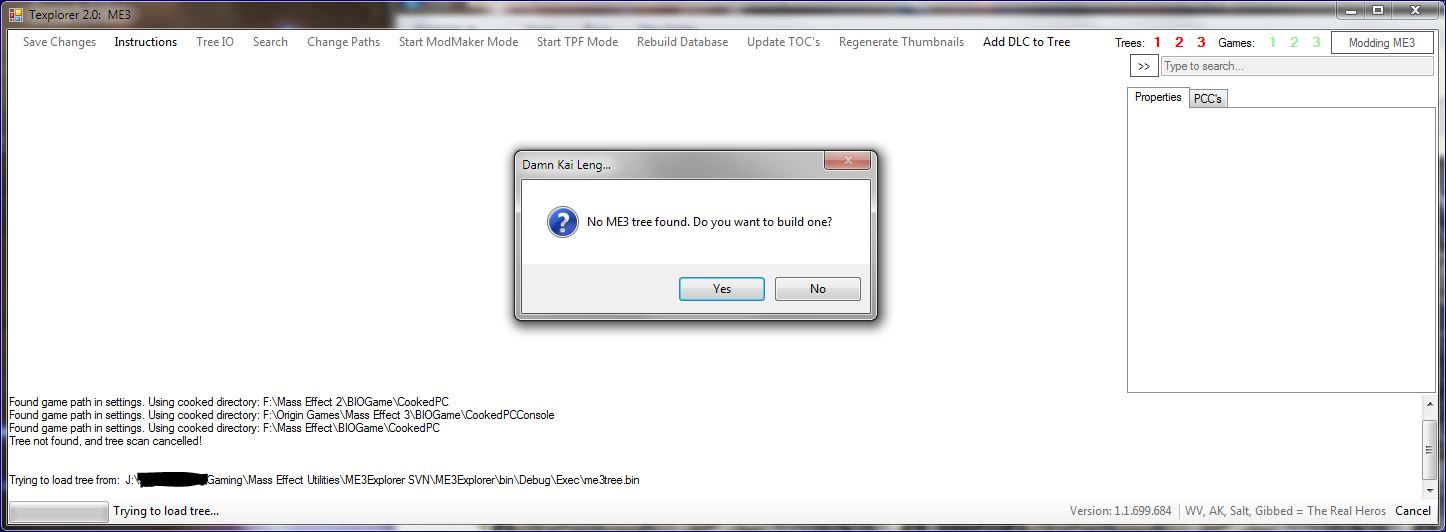
Before clicking Yes or No there are three things to verify, all in the upper right of the window:
- Game Path Indicators.All indicators for games you have installed (and want to mod) should be green. If an indicator is red that means Texplorer does not have the proper path and scanning will not work. If this is the case, click No in the pop up window, and use the Change Paths menu option at the top to define a new path. Paths should lead to each game's ..\BIOGame folder. Don't proceed until the path for the game you want to mod is detected properly.
- Game Scan Indicator.The tool will assume you want to build a tree for ME3, as indicated by the Modding ME3 button. If you wish to build a tree for a different game, click No in the pop up window and then change the button to the desired game.
- Tree Indicators.If using the tool for the first time, these indicators should be red since no trees are present. If this is not your first time using the tool and your goal is to replace an existing tree, then you should use the Rebuild Database option. This will delete the current tree for the selected game, and then do a new scan. Of course you may also do this manually by navigating to the tree's location on your PC, deleting the desired me#tree.bin, relocating it, or appending a .bak extension.
Treebuilding
When you are ready for Texplorer to start the inventory process, click Yes. A window will appear that allows you to choose exactly which files to scan.
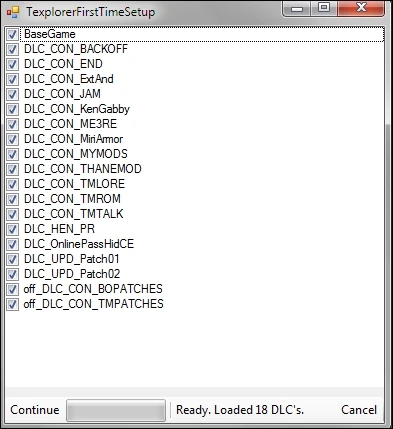
Folder choices during Texplorer scanning.
Note that the screenshot above shows four different types of files:
- Base game (the main Cooked)
- BioWare DLC
- Active DLC mods
- Inactive DLC mods (disabled with the "off_" prefix)
If a "NOTEXTRACTED" tag is adjacent to any DLC name, it's still packed in an SFAR. Packed DLC are grayed out and cannot be scanned. If you wish to scan the DLC, close the toolset, re-open, and allow DLC extraction from the initial check. If the extraction prompt doesn't occur, you probably disabled it in the Options > Advanced. Untick it, close, and re-open again. Then, head back into Texplorer.
As you decide which DLC to scan, keep a few things in mind:
- Modifying DLC requires the DLL Patcher as linked in the Getting Started Guide.
- To browse and mod textures in each DLC listed, you must scan the files.
- DLC mods that are temporarily turned off (via the "off_" or any other prefix) should not be scanned. Remove this prefix to enable scanning.
| Activate all DLC mods prior to scanning to building them into your tree. Once you've finished modding textures then turn "off" any DLC that you won't be using for your current playthrough. This will allow you to place modded textures into all DLC mods — including those that can't be used simultaneously — like JAM and MEHEM. |
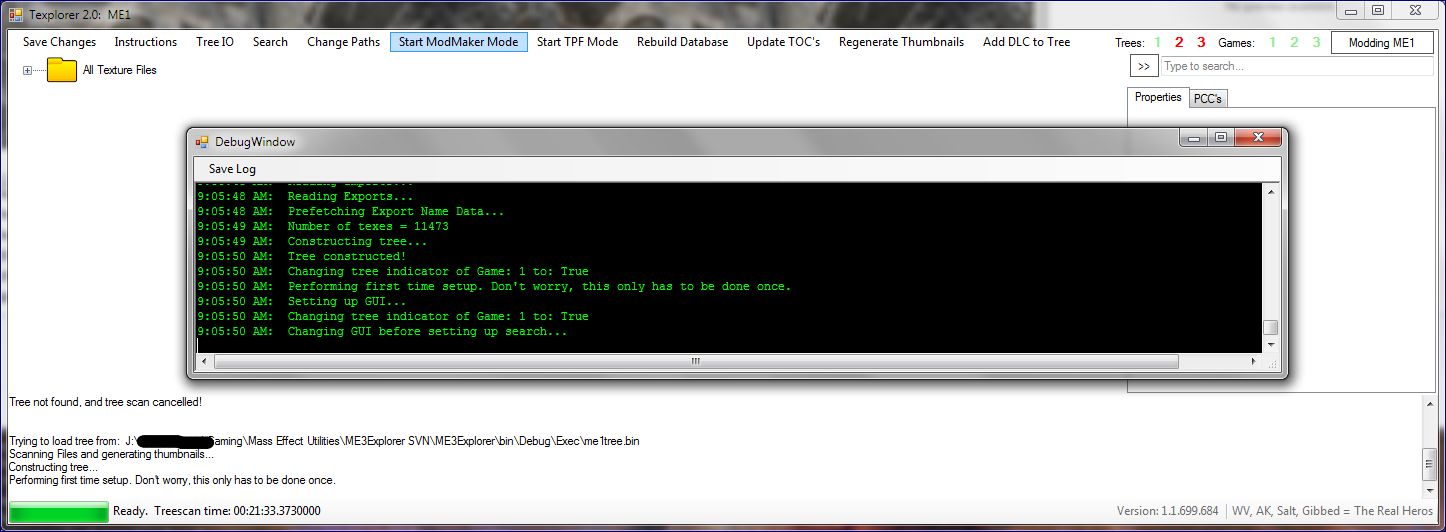
Uncheck any folders that contain files you do not want to scan, then click Continue on the bottom left. When the window looks like this, the scan process has begun:

Treescanning is extremely robust on toolset revisions 700+. As long as files are not modded with textures and pathing is set up properly, problems are rare. Monitor the Debug Window and the Status Bar (bottom left) for progress and important messages. If progress ever stops, then there is likely an issue. If you run into problems, consult the FAQ below.
The game's tree indicator will turn from red to green when the scan is finished, and a folder representing the base of the tree structure will appear on the left side of the window.
To build trees for ME1 or ME2, change the Modding Game button and repeat the procedure. Scans for these games will be simpler since other mods are unlikely to be installed. If they are, then the same rules still apply.
After Scanning
Once Texplorer is finished with the treebuilding process, it's smart to take the opportunity to back up certain files. This will save time later.
- Tree files for any/all games. Making copies now will allow you to quickly drop them back into the proper folder when updating the toolset. Trees are stored in different locations depending on whether you're using the Stable or Beta version. Back up any file named me1tree.bin, me2tree.bin, or me3tree.bin in these locations:
- ..\ME3Explorer\exec\
- ..\ME3Explorer\Debug\exec\
- Thumbnail Cache. The ..\Thumbnail Caches folder is located in the same directory as the trees. Backing it up will prevent you from having to regenerate thumbs.
| When backing up trees it's imperative to have a record of two things: the revision they were built with and any content mods installed. Stay organized by storing backups in folders named by revision. Place a short text file in the folder with relevant notes. |
Outdated Trees
As the toolset evolves, it's possible for trees built with old versions of Texplorer to become incompatible with new versions — a bit like the relationship between MOD files and ModMaker. Having an old, incompatible tree doesn't mean you must vanilla a modded game and re-build immediately. It only means that you shouldn't update to the new version until you're ready to build a new tree.
After updating to ME3Explorer v2.0 (which requires new trees), trees should remain compatible for a significant length of time — until if and when Kfreon re-writes Texplorer. Any future announcements about tree compatibility and updates will be made with the associated download on Git and Nexusmods.
| If your only purpose for treebuilding is to install TPFs with the TPF Tools, you're finished! Close Texplorer and head over to TPF Tools. |
Basic Usage[]
| Using Texplorer will permanently alter your game files. Have you heeded the warnings and the top of this article, fully read the Background section, and completed Preparation? You should also read Textures in Mass Effect. |
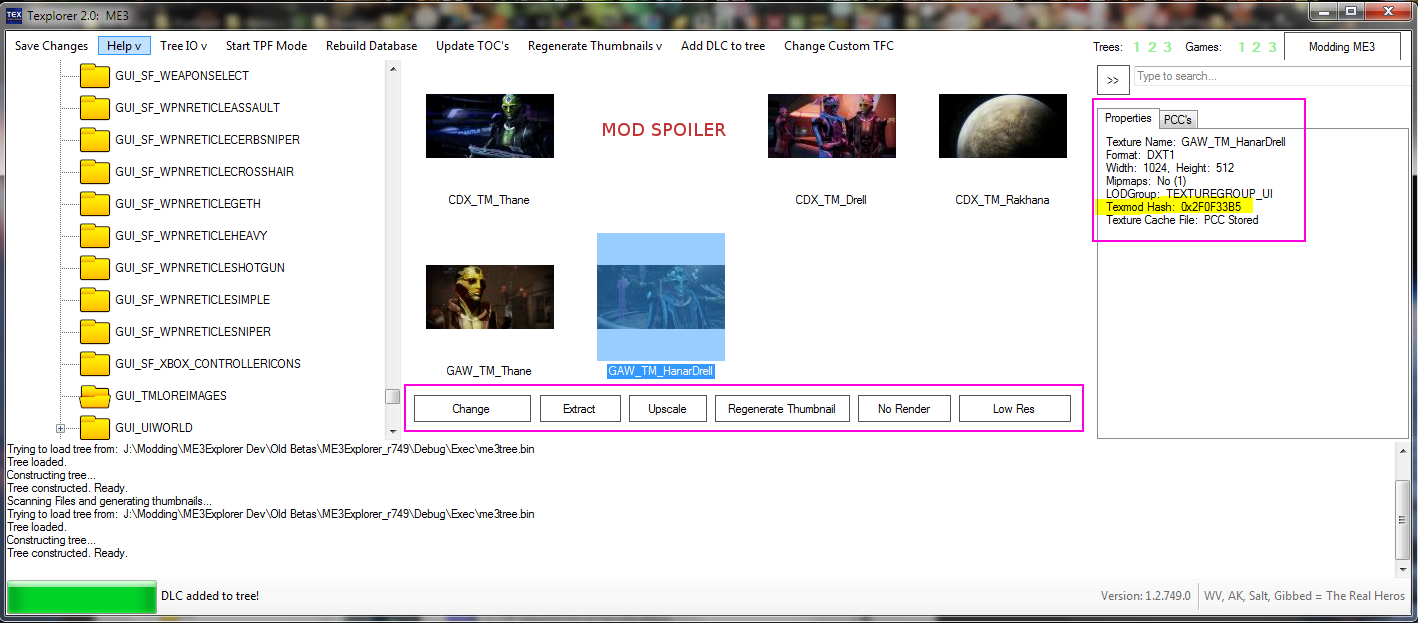
Texplorer isn't a complex program, but the amount of information present in its GUI can be overwhelming to new users. This part of the article will provide an overview of the GUI, and teach you how to use the tool.
GUI Overview
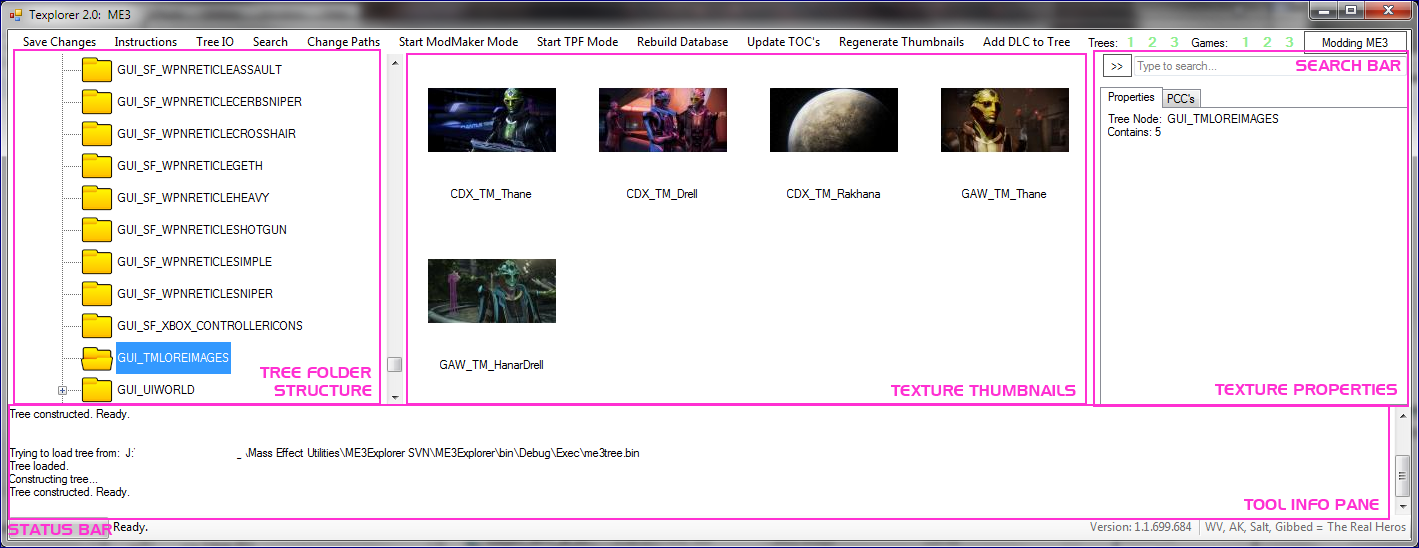
Texplorer organizes texture information into four panes, accompanied by a menu bar across the top and a status bar across the bottom.
Scrolling over each pane will display a helpful tooltip describing the contents. These tips will also appear when clicking Help > Toggle Tooltips in the top menu bar, and similar tooltips will appear when mousing over buttons.
Pane functions are as follows:
- Left — the folder "tree", which reflects the game files
- Middle — texture thumbnails; select and double-click to enlarge
- Right — texture properties and file details (like the hash)
- Bottom — tool information (basic debug output)
The tree is navigated similar to a hard drive's folder structure in Windows Explorer. Also, as in WinExp, all panes can be re-sized. Clicking the double arrow adjacent to the Search Bar, minimizes the right pane to expand the area for thumbnail browsing.
| To prevent display issues with menus, don't shrink the width much smaller than the window's original size. |
The Search Bar is an extremely important feature in the tool. With it you can search by hash, texture name, PCC name, and export ID. The screenshot below also shows information about a selected texture's PCC files:

Texture Manipulation
Texture manipulation in Texplorer is very simple. There are really only two options: extracting and changing. Menu options don't appear until you select a texture, which is also when the detailed properties are shown:
Extracting a texture is as simple as selecting it and clicking the Extract button. When a texture has mipmaps, this will automatically extract the parent (largest)texture.
Changing a texture is slightly more complex. Always use the vanilla texture as a guide, which means accounting for these properties:
- File type
- Compression format
- Size and proportion
- Mipmaps (Yes = has mipmaps, No = no mipmaps)
See Textures in Mass Effect for more details, and don't forget that Image Engine can be used to reformat improperly formatted textures. When ready to replace a texture, select its thumbnail and click Change. In the window that opens, navigate to the proper location on your PC, select the texture, and click Open. Assuming it's formatted properly, there will be a confirmation of successful replacement. It's at this point the TFC is modified in ME1/2, and CustTextures0.tfc is created for ME3.
You aren't done yet.
Next, click on the PCC tab in the right pane. Verify that you want the texture change to apply to all PCCs that are currently checked. If not, then uncheck any desired PCCs.
| Avoid using PCC-specific replacement in ME1, if possible. Textures are handled slightly differently, which can lead to problems unless all files listed are selected. |
| PCC-specific replacement can be very handy for ME3's DLC mods. ThaneMOD, for example, modifies the cabin photo file and supplies supplementary DDS textures. By specifying the cabin photo texture replacement should only affect the ThaneMOD-specific PCC, the user ensures that the base game file stays 100% unmodded. |
Repeat the steps above until all desired textures are replaced. Any changes to selected PCCs will be retained as you navigate through the Texplorer tree.
You aren't done yet.
Before exiting out of the tool you must click Save Changes on the top menu. No changes are saved until this button is clicked. When it is, the PCCs are modified and the edits are fully complete.
| No Render, Upscale, and Low Rez menu functions are not implemented and cannot beused. |
Other Menu Options
Other menu options in Texplorer include:
- Help > Wiki Article — Opens this wiki article.
- Tree IO — Provides a handy option to import/export trees and thumbnails. Remember that not every tree is compatible with every version of Texplorer. If you try to import an incompatible tree, the tool will tell you. The Export feature also provides a convenient option to save the tree data as a CSV.
- Rebuild Database — Deletes a game's existing tree and thumbnail cache, then performs a new scan.
- Update TOCs — Uses AutoTOC to generate new TOC files for the base game and all DLCs you've scanned. If you're concerned the tool didn't TOC after inserting new textures, then this is a nice button to have. It shouldn't be needed, however.
- Regenerate Thumbnails — Rebuilds the thumbnail cache by folder or entire game. A similar option that is texture-specific is depicted in several of the screenshots above. Both are useful if you think the thumbnail no longer matches the installed texture, or if the thumbnail is missing. This should be rare.
Advanced Usage[]
Texplorer's advanced features are geared towards modders to assist with creating mods, but can be used by anyone.
Adding DLC to Trees

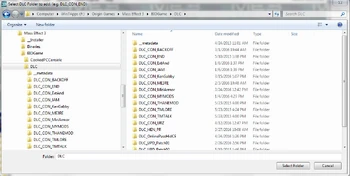
Adding a DLC to an existing tree.
Implemented in ME3Explorer v2.0 due to high-demand, this feature allows DLC to be scanned and added to an existing tree.
Having this ability is a huge time saver. For mod users, it means being able to install a new DLC mod and immediately mod in textures without having to vanilla and build a new tree. For mod creators, it means being able to build the new DLC mod you just made into your existing tree, which is the first step in building a custom TFC.
To add a new DLC, just choose Add DLC to Tree and select the DLC's root folder in the window that opens. Texplorer will scan the files and add it to the existing tree; watch the progress bar for a completion message.
Customizing the Destination TFC

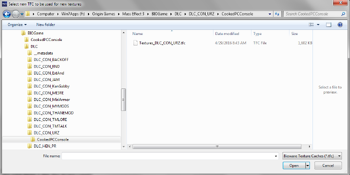
Customizing the TFC for new textures.
Added around the same time as "Add DLC to Tree", this feature is geared toward mod creators and should not be utilized by typical mod users.
Customizing the destination TFC allows modders to force new textures into an existing TFC (such as the the one already created for their DLCmod), rather than having them default into CustTextures0.tfc. This saves a significant amount of time, as before this option was in place, new textures could only be added upon TFC generation. This meant that every time the modder had to add a single, new texture, they had to start over from scratch and generate an entirely new TFC.
- To use:
- Click Change Custom TFC, then navigate to the TFC's location.
- Select it, and click Open.
All changed textures will save to this TFC for the remainder of the Texplorer session. Once Texplorer is closed and reopened, the destination will default back to CustTextures0.tfc.
Creating TPFs
For modders who want to distribute new textures as TPFs, Texplorer has a convenient, integrated TPF-creation function. Start TPF Mode allows the user to "record" a texture replacement without actually altering the files, with the TPF-building portion taking place inside an instance of TPF Tools.


- To use:
- Click Start TPF Mode to initiate building mode.
- In the pop-up, click Yes if you are certain you want to enter TPF mode.
- Start TPF Mode now changes to Stop TPF Mode, and Save Changes is grayed out. To re-enable the ability to save, stop TPF mode.
- Use the directions above in Texture Maniplulation to change the desired texture.
- Upon a successful "change", the progress bar will display "Job added to TPF Tools!", and Texplorer will launch TPF Tools in the foreground. The new texture will appear in the left pane.
- Click back into Texplorer and repeat the above two steps until you have added all textures to the TPF Tools window that you wish to be incorporated into the TPF.
- When finished adding new textures into TPF Tools and follow the directions in that article to finish creating the TPF.
- When finished in Texplorer, click Stop TPF Mode and proceed with regular replacement, or exit out of the tool.
FAQs[]
Below are quick-reference answers to some of the more frequently encountered issues when using Texplorer.
SCANNING — I accidentally deleted my me#tree.bin. My game is modded with textures and I want to add more. Do I have to vanilla and re-scan in order to add more new textures?
Yep.
SCANNING — So... I can scan on modified files?
Yep. As long as they aren't modded by textures. Scanning on content mods that add new textures is also okay. See An Intro to Mass Effect Mods if you don't understand what a content mod is.
SCANNING — What about these new DLC mods?
DLC mods are great. Scan on them all you want. Everything you need to know is already in this article and in An Intro to Mass Effect Mods. Just remember that texture mods can only affect those textures currently in the tree. For textures to be in the tree, they must be scanned. To be scanned, their files must be in the game directory. So, to apply textures to your content mods, install the content mods before scanning.
SCANNING — But... Texplorer is warning me about modified files.
As long as those files are restricted to non-DLC content mods or DLC mods, it's okay. The warning can also happen if you extracted your ME3 DLC manually.
If you aren't sure, a list of the "modified files" is located in the Debug Window (black window, green text). If these files are in the base game or BW DLC and you don't remember if they have texture modifications or not, then you should vanilla your game before scanning. Follow the Troubleshooting: How to Vanilla to do this.
SCANNING — I already have textures installed, but I want to install a new DLC mod. Can I?
Sure, just drop it in. But, your texture mods won't affect these new files. If you want your texture mods to affect your new DLC mod. make sure you're using ME3Explorer v2.0 and then use the Add DLC to Tree instructions above.
SCANNING — I get an error about "reading past the end of the stream."
This can happen when scanning on texture-modded files. If you didn't receive a "modified files warning" and this still happens, you're out of luck until Kfreon's tool re-write. Chances are, you have modified files are some other non-toolset-related problem.
SCANNING — Texplorer is hanging/freezing during the scan.
This used to be due to modified files, but with ME3Explorer v2.0, this shouldn't ever happen. Instead, it will simply skip problematic files, and then throw a "These files didn't scan" error at the end. In 99% of cases this is due to modded textures, or some type of pathing problem. Vanilla your game via the instructions in Troubleshooting: How to Vanilla and make sure you're using ME3Explorer v2.0. Then, reinstall your content mods and re-scan.
SCANNING — Do I need a new tree for every new ME3Explorer revision?
No. You only need a new tree when the developers says you need a new tree.
USAGE — Updating Texplorer forces me to re-scan. Can this be avoided?
Yep... as long as you made back ups for your trees, and/or didn't overwrite your old install of ME3Explorer. Just close out of the scan and follow the instructions in Other Menu Options above to import trees. You can also copy and paste the trees and thumbnail cache manually.
USAGE — Do I have to use the texture replace features inside Texplorer?
Nope, not at all. Most users don't actually need to do anything with Texplorer past scanning. TPFs are installed via TPF Tools.
DDSes may be installed with either Texplorer or TPF Tools, both of which have different advantages. For example, Texplorer can only install one DDS at a time, but it allows you to see the existing texture prior to replacement. TPF Tools can install many DDSes with one click, but there's no way to see the tree's current texture prior to replacement.
There are many other differences, so use whichever you prefer. The main thing to remember is that to use DDSes with TPF Tools, the file name must contain the hash for the texture you want to replace. This is the only way the tool can "match" the DDS to the current texture in the tree.
Sometimes this happens after treescanning. Close the toolset completely and re-open.
ISSUES — There are thumbnail errors in the Debug Window... is that bad?
Yes and no. All it means is that particular texture won't have a thumbnail in Texplorer. It will either be "empty" or have a placeholder icon. This shouldn't happen in ME3Explorer v2.0 and above.
ISSUES — Help! I've encountered an error not in this FAQ!
DON'T CLOSE THE TOOL. Make sure you have copies of the Debug output and screenshots of the tool. Then consult Troubleshooting for guidelines on how to first troubleshoot the issue yourself, and submit a help request on the forum, if necessary.
Related Tutorials[]
Section reserved for any future tutorials.
| Tutorials written by Kfreon, Ottemis, and MrFob contributed to the creation of this article. |