| This article has been updated for ME3Explorer v3.0. |
| Kfreon is the lead developer for ME3Explorer's ModMaker, created in 2012 by Saltisgood. |
| Using ModMaker to install a mod permanently alters your game files. Be sure you have completed the ME3Explorer Setup Guide and backed up your game(s) before using this tool. If you plan to mod your game with new textures, you should complete the Texplorer article prior to using ModMaker to install a .mod file. |

ModMaker is a tool used with files that have the ".mod" extension. MOD files are currently only compatible with ME3 and may come packaged with a variety of game resources. For basic information about MOD files, see An Intro to Mass Effect Mods before reading the rest of this article.
Background[]
Before using ModMaker to create or install a MOD, there are a few important details to consider, including asset restrictions, revision-dependence, DLC mod compatibility, and texture/localization handling.
Revision-Dependence
The largest advantage to using ModMaker is intermod compatibility. Since MODs edit game files rather than replace them, different MODs can apply changes to the same game file. As long as the changes don't overwrite the same assets, all changes will safely exist side-by-side in game. This is different from mods that replace entire PCCs via overwriting or overriding, which are incompatible unless a patch is made.
However, MOD files have one very, very important limitation: they are revision-dependent. This means that to a certain extent, every MOD file is linked to the version of ME3Explorer/ModMaker it was created with. This is due to the scripting used to generate the MOD file, which can change with new releases of the toolset. Once it changes enough (this can take many revisions), the MOD file will no longer work and must be re-made by the author. For this reason, authors should always note the revision the MOD was created with in its associated documentation.
.Mod Files for DLC Mods
MOD files are PCC-specific. This means that they cannot install assets to DLC mods unless specifically made for the mod. In other words, if BioD_CitHub_Hospital_Ash.pcc exists in both the base game and a DLC mod, the latter will only be affected if the author explicitly creates a MOD file that edits the DLC. There is a workaround for this limitation, which is covered in the FAQ below, but users should attempt it with care and caution.
Texture + Localization Handling
Due to the revision-dependent nature of MOD files and the creation of TPF Tools, using MODs to install textures is deprecated. While there are many texture .mods still available, TPFs are superior and should be used instead. They also provide the advantage of being compatible with Texmod. See TPF Tools for more information.
Users should be aware that MODs altering story content may contain localized files (suffix: LOC_XXX.pcc). These MODs may only be used with games of the same localization. Using them with alternate localizations requires manual modification of the script. This is an advanced technique that will not be covered in this article.
Preparation[]
Prior to installing or creating a mod with ModMaker, a small amount of prep work is necessary to minimize problems.
- Ensure proper game pathing by following the ME3Explorer Setup Guide.
- If you want ModMaker to affect BioWare DLC, they must be extracted prior to using the tool. To do this, see the ME3Explorer Setup Guide. If you attempt to run a .mod that modifies DLC and your DLC are not extracted, the tool will warn you (see FAQ).
- While you don't need a "Texplorer tree" to use ModMaker, it's smart to generate one before using the tool. That way, you won't have to vanilla your game later on if you decide to mod textures. For help with tree creation see Texplorer.
- If you wish to install a .mod file, you must have downloaded one from a hosting site (like Nexusmods).
Basic Usage[]
Installing a mod in ModMaker is easy. It requires five steps: pathing verification, loading the mod, compatibility verification, configuring the options (often default is best), and, finally, "running the MOD jobs", which applies the new content to the game files.
Verify Game Pathing
Game pathing must verified before ModMaker can install or create a mod.


To verify pathing:
- Open the tool by going to User Tools > ModMaker. Note: Keeping the Debug window open and minimized is helpful if you need to troubleshoot any errors with the tool.
- Look at the numbers on the top right. They signify which game executables have been found (ME1/ME2/ME3). Green is good, red is bad.
- If the game you intend to modify is red, first check that your files are in the proper location before changing paths. If they are, consult the ME3Explorer Setup Guide for information on how to change game paths.
- For help at any time, use the Help option to navigate to this wiki page.
Load a MOD
| Revision 591 introduced changes that impacted the script for DLC texture and mesh replacements. MODs created prior to this revision are outdated, incompatible with current DLC extraction methods, and cannot be autofixed or used with newer versions of the toolset. |
Before loading a MOD, locate the progress bar and "Ready" text at the bottom left of the window. This will change during the loading process and can provide helpful details.
To load a MOD:
- Click on Load on the top left.
- In the window that opens, navigate to the location of the MOD file on your computer.
- When you've found the MOD(s), select it/them and click Open on the lower right. Note: You may load more than one MOD file at a time.
As the MOD(s) load, the progress bar will fill and the text will change, indicating how many MOD files and resources have been loaded. There's also a chance that you will receive an error dialog about the MOD being outdated. If greeted with the message about an outdated MOD, proceed to the next section. If the MOD loaded successfully, skip down to Configure MOD Options.
Update Old MODs
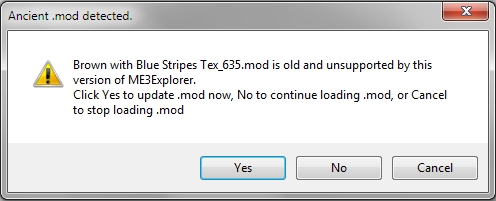
ModMaker warning that the MOD file being loaded is outdated and incompatible with the version of ME3Explorer being used.
As discussed above, MOD files will often become outdated as the toolset evolves. Ideally, the mod author will keep their files updated, but at some point most mods are abandoned. To compensate, ModMaker always checks MODs upon loading, and attempts to repair and update any that are outdated. It's not foolproof and can't repair very old MODS, but most files beginning with rev 592 should be fixable. If successfully fixed, the MOD is fully usable.
Upon triggering the "outdated mod" dialog, choose how to proceed:
- Automatic repair — Click Yes if you want ModMaker to repair an outdated MOD. Note: Updating doesn't alter the .mod on disk, only as loaded into the tool. Therefore, each time you re-load the same .mod it will need to undergo the update process. This is so you can keep the original file in the case ModMaker makes a mistake and it doesn't actually need updating. You can prevent the repeated repair by saving the updated .mod to a new file.
- Manual repair — If you have some scripting knowledge and and want to check the script yourself, you can decline the offer and click No. This will load the outdated MOD into the tool and no updates will be applied. Then you can proceed to the section below and examine the displayed script.
- Decline — If you've changed your mind and don't want to use the outdated MOD, click Cancel.
Configure MOD Options
| ModMaker is currently only usable with ME3, but is technically cross-game, meaning that you don't have to tell it which game to target when running a MOD. |
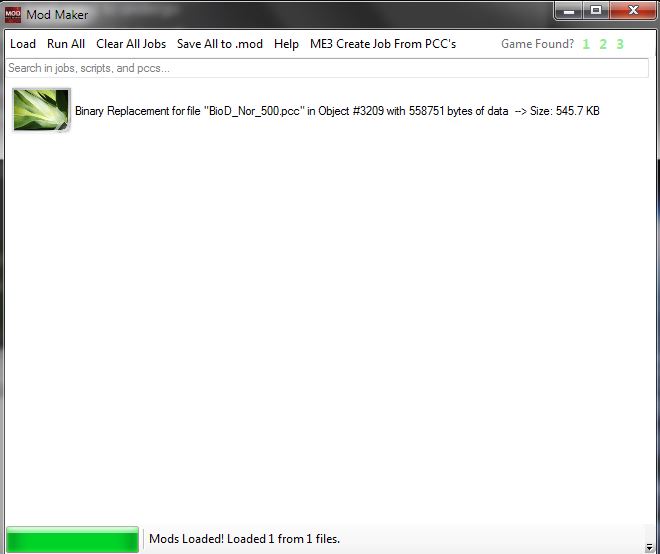
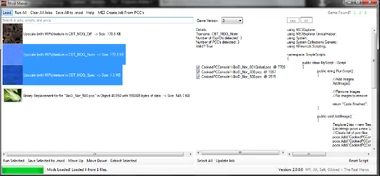
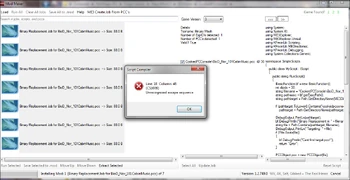
Simple MOD successfully loaded into ModMaker. One change in one file, as referenced by the text adjacent to the green bar on the lower left.
Once you've successfully loaded/updated a MOD, the contents of the ModMaker window will vary with what's packaged in the file. The simplest MOD that only affects one "resource", in one game file, will look similar to the picture on the right.
Each resource the MOD changes has a thumbnail to its left, which is either a placeholder image (non-textures) or the game texture. The information associated with the resource tells you several things, including: what kind of game file is being modified, its file path, ID numbers (export IDs) associated with the resource in the file, and its size in both bytes and Megabytes.
When you click on one of the resources, the rest of the window is populated with information by sliding out from the right, and the window (when properly sized) will look something like this:
There are now 3 panes of information:
- Left pane — Displays the game resources contained in the MOD file and a new menu appears at the bottom.
- Center pane — Displays information about the MOD file. This includes the game version it applies to (ME3) and a checklist of all files affected. The game is editable via a dropdown in case you believe the tool has matched the MOD to the wrong game. There are also some additional technical details, including the texture name (or "Binary/Mesh" if not a texture), total count of files affected, and the number of Export IDs detected. The "Valid" field indicates the MOD's script is valid. Select All applies when multiple PCCs are listed. Update Job should be used after editing the script/modifying PCC choices. "Path" and "ExpID" boxes at the bottom are editable if you believe they are incorrect.
- Right pane — Displays the MOD script. If you wish to edit the script yourself, this is where you'd do it. The pane is fully editable and can be expanded with the Arrow buttons at the top. The left arrow maximizes and restores the script pane, obscuring the center panel. The right one hides the script pane. Don't forget to Update Job after editing the script/modifying PCC choices. You can also reset the script to its "as-loaded" state via Reset Script on the lower right. Note: "As-loaded" DOES NOT include the Update Job process. Guidelines will not be given for script editing. This pane should only be modified by experienced users who are 100% confident they know what they're doing.
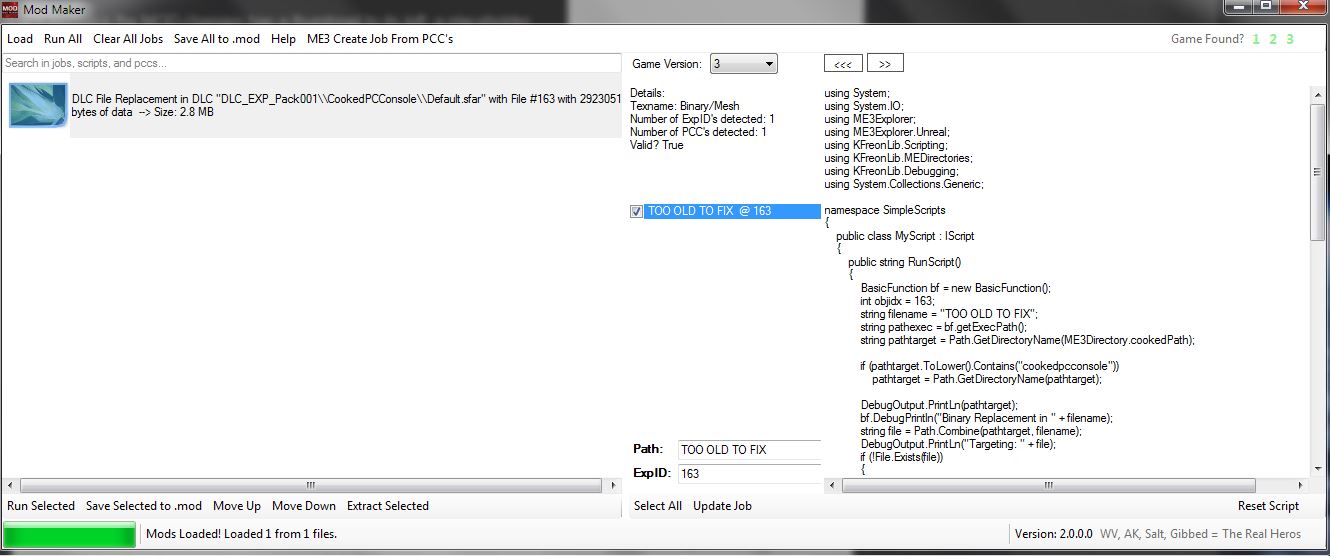
Notice that if you had ModMaker fix an outdated mod, this is where you'll find out if that fix applied correctly. Instead of a file name in the center panel, "TOO OLD TO FIX @ 163" appears. This message means the repair process did not fix the file and this MOD cannot be applied. This MOD file is unusable until it is updated by the author. FYI, this is an old .mod file made to replace entire PCCs inside SFARs. This method is deprecated and no longer usable with the toolset.
Let's now look at a larger, updated MOD file that contains a replacement textures (yes, this is also deprecated, but it makes a good example)3:

This obviously looks quite different from the other MOD. Here are some key points to notice:
- 1 MOD file, 7 edited resources (also called "jobs"), 1 edited texture.
- Thumbnails show the actual texture or are placeholders.
- The "Texname" field in the center panel is populated with the selected texture's name.
- 10 PCCs/ Export IDs are affected for this texture, each of which can be selected or deselected.
- All DLC PCCs referenced in the MOD file are listed, regardless of whether the user has them installed. This is fine. If the DLC isn't present the it will be ignored.
- An additional menu bar appears on the bottom of the left panel once a resource is selected. It can be used with the top menu options to control how each resource is applied.
Before running a MOD, you must be certain all game files you want to apply the changes to are selected for each resource/job. Most of the time you won't want to deselect any, but there three common exceptions to this rule:
- If you know for certain there's a file you don't want to edit, you should uncheck that file.
- If you don't want to edit DLCs, you'll want to uncheck all PCCs with a DLC file path in their name.
- If you only want to apply a change to a DLC mod, you would deselect any base game or BioWare DLC files. To easily search for different PCCs use the Search Bar on the top left.
Run the MOD
| If you bypassed the DLC Extraction notification upon opening the toolset in revs738+, ModMaker will not apply MOD file changes to your DLC — even if you have the proper options selected. To remedy this problem, exit out of the toolset, re-open it, and allow the extraction. |
Once you're certain you have all options configured to your preference, it's time to run the MOD. This is the point of no return. Once you run the MOD changes cannot be undone without manually reverting the game files to their previous state. As long as you've made a backup, this is no big deal.
To run a MOD file:
- Confirm the correct game assignment in the dropdown.
- Confirm your PCC/ExpID selections and any script modifications.
- If multiple jobs in different MODs affect the same asset (Export ID) you need to move them up/down in the list (via Move Up/Down in the bottom menu) to control the overwriting process. The last MOD that changes the asset will be observable in game.
- If you only want to apply the changes of for the resource/job(s) you currently have selected, you may do so by clicking Run Selected in the bottom menu. Select multiple jobs with Ctrl+Click.
- If you want to apply all changes for all MODs you currently have loaded, click Run All in the top menu.
Running a MODs will trigger output in the status bar area, providing information on whether the install was successful. In the case of problems, consult the FAQ below.
To clear the MOD list when finished, click Clear All Jobs in the top menu. You can then exit the tool or load another MOD file.
| It can be useful to re-save MOD configurations for future installs. To do this, use either Save All to .mod or Save Selected to .mod, depending on your configuration. |
Advanced Usage[]
This section is geared towards modders who want to use ModMaker to distribute their assets in MOD files. Certain tools, such as Package Editor, also contain MOD creation functionalities, which are covered in their own articles.
Asset Limitations
While MODs are great for intermod compatibility, ModMaker has significant limitations as to the types of game assets it can detect and bundle into the .mod.
ModMaker will properly detect:
- Additions to a PCC's name list
- Changes to an export's data in a PCC
This is equivalent to a binary replace of the data inside the hex editor tab of Package Editor. We hope to expand its capabilities in the future, but this is all it can do for now. That means ModMaker cannot: change an existing name list entry, add exports, add/change imports, or, even edit export metadata (links, index, archetype, superclass, flags). It also cannot be used with any files that are not PCCs.
Creating MODs
| This feature was removed from the toolset between rev654-737, and restored in rev738. |


There are two ways to create MOD files. The first is by using assets from other .mods, the second is by generating the .mod "from scratch".
- Save to .mod. Any assets currently loaded in ModMaker can be saved into their own MOD file. Just select the desired assets and use Save All/Selected to .mod.
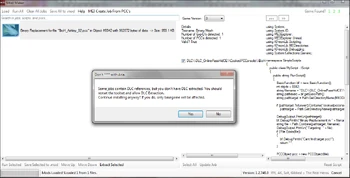
- PCC-Compare. With this method the tool compares two PCCs specified by the creator and it creates a "patch" of sorts contained in the MOD file. Just click ME3 Create Job from PCCs to get started. See the screenshot to the right for guidance.
| Remember, when using PCC-Compare, the modded PCC must be in the proper game directory, or the MOD will not install correctly on the mod user's PC. This means the base file you're comparing the modded file to needs to be somewhere else. |
Extract MOD Data

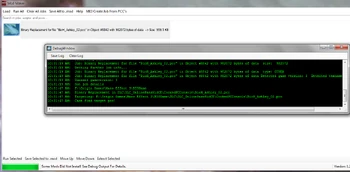
MOD file loaded in ModMaker that has texture and non-texture assets included.
Data may also be extracted from mods for use elsewhere. This can be very helpful for old MODs that no longer work and are not repairable, or to obtain assets to use in other MODs (with permission).
To extract an asset:
- Select the desired asset(s). Multiple can be extracted at once via Shift/Ctrl + click.
- Click Extract Selected and navigate to the save destination for the assets.
- Textures will be saved as DDS files. All other assets will be saved as BIN files. DDS files may be used directly with Texplorer or TPF Tools, or bundled into TPFs for distribution. BIN files can be used with Package Editor's "Replace with BIN" feature.
| When extracting textures, ModMaker uses the texture name to create the file name (e.g. HMM_ARM_FBDe_Diff.dds). Since building TPFs requires the hash in the file name, it must be located after-the-fact via Texplorer, and the name amended accordingly. |
FAQs[]
Below are quick-reference answers to some of the more frequently encountered issues when using ModMaker.
ModMaker's MOD repair feature didn't seem to work. My game crashed. Now what?
First, try running the MOD again. Sometimes things just don't work the first time. Updating should work for all mods made with revs 592+, and especially, 700+. If your MOD fits this description and updating isn't working, search the forums to see if the issue has already been reported and if there's a fix. If there isn't, contact the mod author to let them know their mod is outdated. Then consult the wiki article on Bug Reporting to how report the mod on GitHub.

ModMaker's warning that DLC aren't extracted. If bypassed, the MOD will not apply properly to the DLC files.
ModMaker is telling me my DLC aren't extracted. What do I do?
This happens if you try to run a MOD file that contains DLC assets, when your DLC haven't been properly extracted. Consult Getting Started for how to fix this.
ModMaker crashed while installing a MOD. What do I do?
Try installing the MOD again. If it doesn't work the second time, vanilla your game. While vanillaing shouldn't be required, it's quite literally the first thing we're going to make you do to troubleshoot the issue.
ModMaker takes a long time to install a MOD; it might be stuck/frozen.
First, be aware that installing MODs that affect a significant number of PCC files can take a very long time (hours). Textures are the most common culprit of this, and since ModMaker should no longer be used to install textures, incidents should be rare.

ModMaker failing to install a .mod job.
If the tool seems to be hanging, use the information Getting Started to help you check the file path of your ME3 EXE file. If it's incorrect, cancel the MOD, fix it, and run the MOD again. If that doesn't work, consult the response to the FAQ #2 above.
ModMaker failed to install a .mod.
Take a look at the debug output to try to identify the problem. If you can't figure it out, post a help request on the forums, including the *complete* text of the debug output.

ModMaker script error during installation.
Errors of this nature are unfortunately not fixable without manual modifications to the script.
How do I uninstall a .mod through ModMaker?
This isn't possible. For more information on .mod files see the rest of this article and An Intro to Mass Effect Mods.
How can I create compatibility between a DLC mod and a MOD file?
This is tricky. Possible, but tricky.
First, let's clarify the issue. DLC mods work by overriding existing game files. For additional details, see An Intro to Mass Effect Mods. This means that if a MOD file edits a base game file, and that file also appears in a DLC mod, the DLC mod's changes will override the MOD file's changes. In addition, if the MOD file was installed prior to the DLC mod, the DLC mod can't be affected by the MOD file since it wasn't present when the MOD jobs were ran. Finally, MODs are very specific. They can only affect a DLC mod if they are made specifically for that mod.
For example, the DLC mod BackOff, is semi-incompatible with Ashley Legacy Project, since ELE didn't have BackOff installed when she made ALP and BackOff overrides certain base game files that ALP modifies.
The solution to this problem is to temporarily relocate the necessary DLC mod files into the base game directory, and then re-install/install the MOD.
| Attempt the process below at your own risk; we won't provide further assistance. This only works for MODs that do NOT alter textures, and assumes all your DLC are extracted, as per the ME3Explorer Setup Guide. |
To do this, attempt the following:
- Load the MOD file (in this case ALP) into ModMaker. This will allow you see exactly which PCCs are affected.
- Compare those PCCs to your DLC mod files. If any are present, that's where the conflicts are. Back those up, as you are about to edit them.
- Locate the same DLC mod PCCs you just backed up, inside your base game and BW DLC. Now, back these up, as well, b/c you'll be overwriting them in a moment.
- Once you've ensured you have copies of all PCCs you are about to change, copy the conflicting PCCs from the DLC mod(s) into the main Cooked. In the case of a DLC file, copy it into the relevant BioWare DLC. Allow the overwrite when asked.
- Now apply/re-apply the desired MOD file. You can select only the PCCs you need to apply the changes to, or you can leave all selected.
- Next, if the MOD file(s) are accompanied by texture TPFs (this is the case with ALP), run the latter with TPF Tools to install the textures.
- The DLC mod files now contain the edits from the MOD files. HOWEVER, they still need to be relocated back to the DLC mod to work properly. Copy and paste them back into their original location. Allow the overwrite when asked.
- Almost done. Take a moment now to restore your base game and BioWare DLC PCCs -- the ones you overwrote with the DLC mod files.
- As a final step, AutoTOC the base game and all affected BioWare DLC and DLC mods.
When done properly and when multiple DLC mods don't affect the same file, this should work. If you have multiple DLC mods alter the same file, then mount priority also becomes on issue. If that's the case, the patch file(s) for the DLC mods must be edited. If there's no patch, then you have to choose the DLC mod you prefer and edit that one.
Related Tutorials[]
Section reserved for any future tutorials.
| Thanks to Kfreon for allowing the use of his ModMaker tutorial in the creation of this article and to Ottemis and WarrantyVoider for FAQ contents. Thanks also to SirCxyrtyx for clarification on the capabilities of PCC-Compare. |